
Huichol page 34 June 21st - 24th trip cont.
Hold mouse arrow over pic for caption
(only works with internet explorer browser)
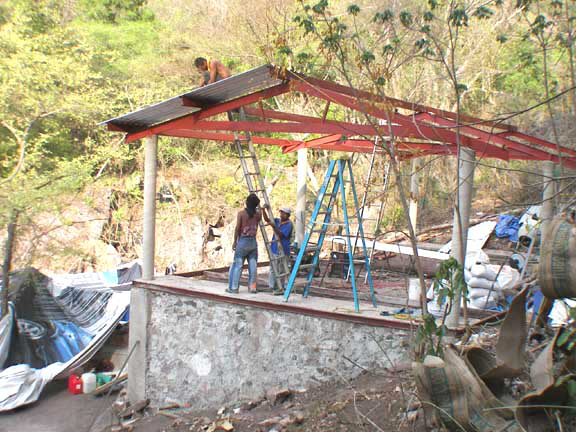
Once three of the long 6" U channel laminar
supports were in place
then the guys could start placing the roofing on one side. They thought
this would be quick. It wasn't. Just getting them to understand we had to
layout markings on two of those long 13 meter pieces where each
piece
was to line up so we didn't end up with a diagonal roof 13 meters
away
was a challenge. And then I caught them several times not using those
markings after they were there. And then I couldn't get them to remember
to set the top piece 4 cm in front of the cross beam. And then instead of
placing the first three screws where I told them each time to set the
position
of the laminar they continually wanted to secure the whole sheet to the top bar,
then the next bar, then the next bar. They just couldn't keep the steps and the
rules straight and in order on how the laminar was to go down. I am not a
perfectionist but I am not into slop jobs either and the first half of the
roof, although adequate, is not how I wanted it to go down. But I was trying to
weld the 3 long pieces and cross bracing into the other side while they were
securing laminar on the first side so I couldn't bird dog them every
minute.
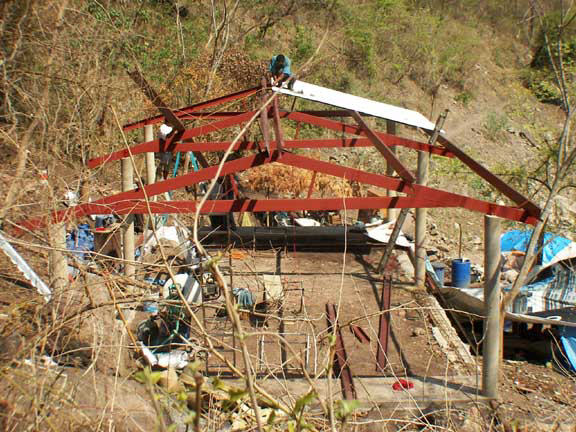
One side has been completed here to be able to
start securing the roofing sheets, which are 26 caliber called cal26 thickness
galvanized sheet metal.
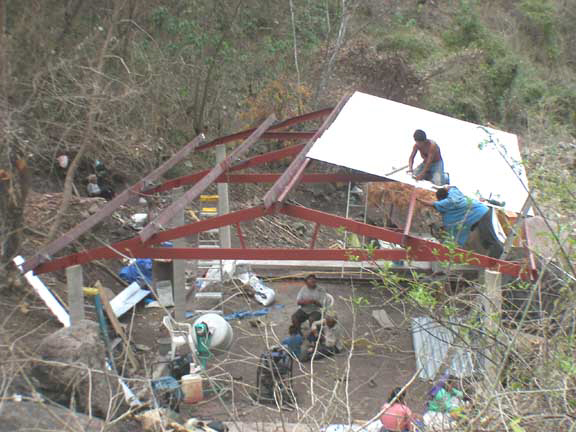
Top view of installing the laminar sheets. If you
look at the edges you
will see what I mean about them not following the markings or setting
the leading edge the right distance away from the beam. This whole
month has been teaching shop 101 to these guys. They have never
used any tools before. They did not even know how to use a ratchet
wrench, or how to reset a pair of channel lock piers, or that a drill had
more than one speed and the proper pressure to use when drilling, or
how to safely position a ladder before climbing it (24 years as a volunteer
fireman and constant ladder drills left it's mark on me). Trying to get them
to use a rope lanyard tied around them for safety while on the roof was a
constant struggle. They don't understand they are too far away from help to
chance getting injured in a fall. They DO understand rainy season is here
and the roof has to be finished NOW. That part they got. In fact two huge
gales blew in on us this trip. Rainy season came to Huichol land finally.
Wednesday evening was a 50 mph storm that blew in and I thought my tent was
going to come apart. You know in the states they have produce departments that
have these speakers that make the sound of thunder and then the veggies get
misted? Well the rain hit the tent so hard that inside I felt like a
Safeway radish getting misted for a good hour and a half. I had to literally
pack my sleeping bag back in my Navy seabag and put a towel over me and if it
weren't for the 6" thick air mattress letting the water run underneath it
could have been a wet scene. I knew there was a reason I pounded in three
foot long 1/2" rebar to stake that tent in all four corners. But that
was nothing. Last night the biggie came in. The clouds were pure black and just
dropped out of the sky, straight down. It was a big uh-oh. Winds were at
least 50 to 70 mph. I literally braced the inside of the tent with both legs to
keep if from going flat and braking the fiberglass rods; and again the rain
pelted the walls so hard that mist came through, even through the rain fly. That
storm literally destroyed the rest of the camp. The women's cooking area and
firepit they had mounted on a table was completely blown apart; the big tents
the rest of them stayed in were severly damaged because they didn't heed my
warnings of using rebar instead of the puny tent stakes that come with them -
BUT the building and roof along with the outhouse didn't suffer a bit. Pastor
Dagoberto laughed at me when I showed him all the bracing I wanted to put into
the roof, but after last night I wouldn't have used one piece less. He also
laughed at me for making them put a screw in every raised V in all three support
beams but I think they have a better understanding of why I wanted that now too.
Hey, the outhouse remained standing also. Americano built tough!
Installing the laminar. You see what I mean about the top edge not being
consistent. It was just too much to remember for them and I wasn't on
them
hard enough with each piece while I was busy welding on the other three
support channels. TeBrucio's position on the ladder isn't exactly how I
preached ladder safety either. It's interesting working with these guys.
They are willing , eager, do what they are asked most of the time, and
continually wonder why I ask all these things to keep them in one piece.
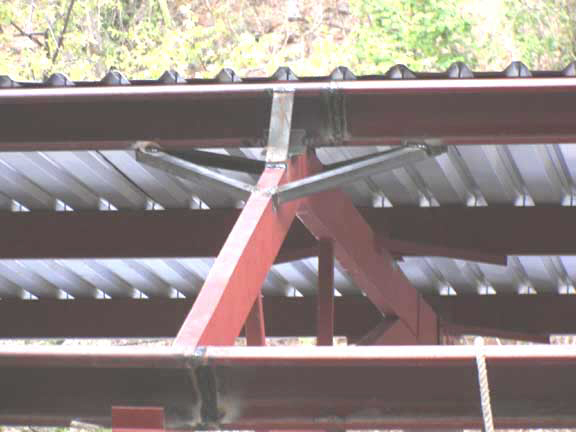
Here's a closeup of the support structure to keep
this building together
in gale force storms such as we have already seen here. Also note the
laminar roofing is screwed down every V node. Since there are only three beams
supporting the laminar, and considering the strength of the winds
here, I considered this cheap insurance at a nickel a screw.
Next trip involves two things. One, installation of the 5W solar panel and LED light system sent us by a gal in Canada named Cindy McArthur. Her website is http://altalux.com/page11.html where you can see some pics of these very special lights. The 5W solar panel should run three lights for 4-5 hours, using a small motorcycle battery and charge controller. I picked up an outdoor electrical box at a roadside flea market stand for $10 to house all the components in and we've already drilled the holes in the 6" truss end to mount the assembly on. I just have to make the brackets and all here to hold the solar panel itself.
We
also have to move the kitchen area from where it was destroyed to up on the
south end of the slab and shelter area. The problem with this is that we are
then 4' above the level of the spring and can no longer get water to gravity
feed to the kitchen sink. I will be buying a small storage tank that will be
placed maybe 10-12' above this area and a small 1/4HP pump using the
generator to fill this tank from the other storage tank, at least until we can
get the upper spring cleaned out and a line down from it; but it is a long ways
away. We will probably set up a storage tank that feeds the plateau from the
upper spring and come off of it down to the small kitchen tank , but that isn't
going to happen for a few more months yet. Gardening and individual housing will
come first.